Everyone these days understands the benefits of automated continuous integration builds. The ability to continually build a code base and execute various automated tasks to evaluate the integrity of each iteration is invaluable. Yet there is still some confusion as to how exactly to implement this, or is something we are constantly re-inventing.
Case in point, today I find myself researching unit test integration into our automated build solution.
My friend
Kent Boogaart posted a
great article about continuous integration. His solution is to integrate these tasks into the solution, and have MSBuild execute them. This has a number of benefits, including portability (I have used CruiseControl.Net previously, and Jenkins currently) and local execution. My primary role is developer, so I am rather partial to this last point; if we are responsible for failures in the build process, it is paramount that we are able to reproduce the process locally.
Now, Kent's article provides a great overview of the process, but I always find myself rooting around for resources to help implement an MSBuild integration (and re-educating myself on Task declaration). So this article will detail some of these specifics.
Overview
As an overview then, this article will take a solution that has some passing tests and some failing tests. By the conclusion, this solution will build and execute unit tests.
Setup
For this article, I have created a simple solution;
- Create a solution, Example.UnitTests,
- Create a Class Library, call it Example.UnitTests,
- Create a Class Library, call it Example.IntegrationTests,
- Create a folder, Resources, under solution directory
With Example.UnitTests, add a code file Tests.cs
using NUnit.Framework;
namespace Example.UnitTests
{
    [TestFixture]
    public class Tests
    {
        // will always pass, should have at least one of these!
        [Test]
        public void Test_Pass() { }
    }
}
With Example.IntegrationTests, add similarly named code file Tests.cs
using NUnit.Framework;
namespace Example.IntegrationTests
{
    [TestFixture]
    public class Tests
    {
        // will always fail, there is always at least one of these!
        public void Test_Fail()
        {
            Assert.Fail();
        }
    }
}
Example.IntegrationTests should only build on Release mode.
 |
| Figure 1, Example.IntegrationTests will not build under Debug mode, Release mode only |
This may be accomplished by opening ConfigurationManager, selecting Debug solution configuration, and deselecting the Build checkbox next to Example.IntegrationTests project (see
Figure 1 above).
With Resources folder, copy a working set of NUnit console. We will use this execute our unit tests.
Strategy
With this solution, it should be plain to see we have a set of tests we would like to execute in Debug mode only (think quick in-proc tests that verify behaviour at a very fine and granular level for a QA environment) and a set of tests we would like to execute in Release mode only (think long-running system-integration tests that verify behaviour at a coarse use-case level for a UAT or Pre-Prod environment).
Ideally, we want to be in the practice of executing unit tests as often as possible. However, forcing a developer to run these tests on every build is less than ideal or may even be prohibitively expensive.
Our approach then will be to create additional build profiles that target our standard Debug and Release modes, and execute our test suites selectively. Developers will be held to an honour system of running tests prior to major commits, but our continuous integration environment will
always run these tests.
When we are through, our build environment will be able to
- Build Debug and execute unit tests,
- Build Release and execute unit and integration tests,
Of course, these build profiles will also be available to our developers, so that they may verify the integrity of their commit, or at the very least reproduce functional-related test failures in their own environment post build-fail.
Adding Build Profiles
Build profiles are tricky things. Adding and maintaining profiles can be cumbersome and error prone (Visual Studio does not auto-magically add custom profiles to new projects that we add, and is a manual step). Fortunately, we do not need existing libraries or future libraries to implement our custom build configuration.
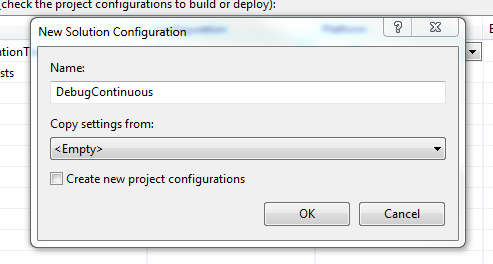
For our purposes an empty light-weight configuration is all that we need. To do so,
- Open ConfigurationManager,
- From Active solution configuration: dropdown, select New...,
- Enter a configuration name, one that starts with "Debug". For this example, I have chosen DebugContinuous,
- From Copy settings from: dropdown, select Empty,
- Uncheck Create new project configurations if it is not already in an unchecked state
 |
| Figure 2, a minimal Debug continuous integration build configuration |
Now may be a good time to create the Release profile as well. Same steps, simply create a profile with a name that starts with "Release" - if you're stuck, try ReleaseContinuous!
This naming requirement may seem odd, but we will be depending on MSBuild's ability to detect similar profiles based on name to target the correct mode for our solution. Basically, when our build environment invokes DebugContinuous, any projects that implement this mode exactly will build in DebugContinuous (more on this in a bit), and projects that do not will build in a mode that most closely resembles this mode (ie all of our existing projects). For our QA builds, this means Debug mode. When a suitable match cannot be found, MSBuild defaults to Release - so it is not the end of the world.
Adding Continuous Integration Project
Now that we have a (solution-wide) build profile for our continuous integration environment, we now need a place to throw in our unit test task. We could simply use any existing project, but for very large solutions, it makes better sense to consolidate our optional continuous integration tasks into a single place that is separate from our test code, so let's add a new project.
Add a new Class Library Project, Example.ContinuousIntegration. Delete the default Class.cs file.
All other projects are fine as they are, implementing only Debug and Release build modes. This one specific project however, will contain conditional elements that require the continuous build mode. So let's add our continuous build modes to Example.ContinuousIntegration. It is very similar to adding a solution-wide profile,
- Open ConfigurationManager,
- From Configuration dropdown beside our project, select New...,
- Enter your debug continuous integration build mode name. As with the rest of this example, I have used DebugContinuous,
- From Copy settings from: dropdown, select Empty,
- Uncheck Create new solution configurations if it is not already in an unchecked state
 |
| Figure 3, a minimal Debug continuous integration build configuration |
Once we have defined our build modes, it pays to review each build configuration. Back in ConfigurationManager, iterate through each solution configuration. Ensure, that when Debug is active, Example.ContinuousIntegration does not build and is set to Debug configuration. Ensure that when DebugContinuous is active, all projects are in Debug mode and Example.ContinuousIntegration is set to build with DebugContinuous. Do likewise for Release modes.
One final check before we modify our project file directly.
- Open Project Dependencies,
- From Projects: dropdown, select Example.ContinuousIntegration,
- Check all project boxes,
 |
| Figure 4, add dependencies to continuous integration project to ensure a convenient build order |
This creates an artificial dependency between our integration project and every other project in the solution. This ensures it builds last. While not strictly necessary, it makes it easier to debug build issues that we may encounter later on.
Now let's crack this sucker open. To edit this project through Visual Studio, first unload the project, and then edit it. Alternatively, use an external program (like Notepad.exe) to modify Example.ContinuousIntegration.csproj; when Visual Studio regains focus, it will detect modifications and prompt to reload.
When you first open it up, it should look something like this,
      Debug

    ...


    ...


    ...


    ...
What we will do next is add another build target that will contain our unit test
execution task. To tidy up the declaration, we will also define some build properties and metadata. Our project file should now look a little something like this,
    bin\Debug\


    bin\Release\

  ...

    "$(MSBuildProjectDirectory)\..\Resources\nunit-console.exe"


      $(MSBuildProjectDirectory)\..\Example.UnitTests\$(OutputPath)


      $(MSBuildProjectDirectory)\..\Example.IntegrationTests\$(OutputPath)
A few things to note,
- Inclusion of AdditionalTasks as part of DefaultTargets attribute,
- Modification of OutputPath property, from default bin\DebugContinuous to bin\Debug, and
- Conditional inclusion of Example.IntegrationTests for ReleaseContinuous only
The rest of it is fairly straightforward. And I'm knackered.
Resources
MSDN MSBuild Reference
MSDN MSBuild Exec Task Reference
MSDN MSBuild Reserved Property Reference
Kent Boogaart's Blog, fail early with full builds
Peter Provost's Blog, custom metadata
Kevin Dente's Blog, run all tests, fail on at least one error